

There are two paid bus tours I would recommend:
 First, skip the day time monument tours; instead do the Monuments at Night – here are some of the reasons: At night the tour is fully guided, which means you get off and on the same bus – no waiting for the “next one to come”(which during the day can take a while); Also – on the night tour you stop at more of the monuments like WWII and FDR (in my opinion two of the best memorials in DC); And most importantly – at night the Monuments are awe inspiring! Nothing compares to the lights shining majestically on Abe Lincoln or the eerily, haunting faces that seem to come to life on the Korean War Memorial (another touching new memorial). Here is the Tourmobile site: http://www.tourmobile.com/tours_seasonal.php

 I do still recommend doing a hop on hop off bus during the day – and for this I recommend a different tour company: Old Town Trolley Company. I recommend this company because they are the only ones to go into some unique neighborhoods that are definitely worth spending time. http://www.trolleytours.com/washington-dc/
For me, I would skip the main route that goes to the Memorials (again do that at night) and instead take the two days (you get two days for the price of one) to explore the Green route. http://www.trolleytours.com/washington-dc/washington-dc-map.html
 First, skip the day time monument tours; instead do the Monuments at Night – here are some of the reasons: At night the tour is fully guided, which means you get off and on the same bus – no waiting for the “next one to come”(which during the day can take a while); Also – on the night tour you stop at more of the monuments like WWII and FDR (in my opinion two of the best memorials in DC); And most importantly – at night the Monuments are awe inspiring! Nothing compares to the lights shining majestically on Abe Lincoln or the eerily, haunting faces that seem to come to life on the Korean War Memorial (another touching new memorial). Here is the Tourmobile site: http://www.tourmobile.com/tours_seasonal.php

For me, I would skip the main route that goes to the Memorials (again do that at night) and instead take the two days (you get two days for the price of one) to explore the Green route. http://www.trolleytours.com/washington-dc/washington-dc-map.html
The Green route starts by Ford’s Theater, which you could do before boarding the bus. http://www.fordstheatre.org/
The next stop is for the White House Vistors Center.
 It is hard to get a good view of the White House because of all of the security and you never know when things will get closed off (when we finally were able to get close up, they cordoned everything off because the President was landing in the Helicopter). However, the Visitors Center is done really and is worth the stop.
The next stop is for the White House Vistors Center.


This route takes you up to the National Cathedral. The Cathedral is beautiful and they have many different tours to enjoy (I have heard the Gargoyle tour is really nice). If you are the picnicking kind – enjoy your food in the picture-perfect medieval Bishop’s Garden afterwards.
Next on the Green route is Embassy Row – on the bus you quickly drive down the street and everything passes too fast. There is one stop on Embassy Row and you can get off, do a walking loop and board the bus again to head toward Georgetown. The embassies are each amazing architectural gems and many have unique stories to tell. To do it the right way, take the time to get off the bus and do a free walking tour by using your cell phone.
Here is a link to maps and how-tos; http://www.woodrowwilsonhouse.org/index.asp?section=podcast&file=podcast
Next up is Georgetown, the oldest part of DC. It is now very trendy with lots of chain stores and restaurants, but it is still worth seeing. If you want to get away from the crowds of the main streets and step back in history, visit the Georgetown Visitor Center run by the National Park System. http://www.nps.gov/choh/planyourvisit/georgetownvisitorcenter.htmThe The Green Route Georgetown stop is by the canal and a short walk will get you to the National Park and Vistors Center.
I love boat rides, so I would also recommend the canal tour. This is a one hour tour on a boat pulled by a mull – just like they used to do.

Here are some other helpful hints of what to do:


Enjoy a free program at the Kennedy Center every evening at 6pm. http://www.kennedy-center.org/programs/millennium/

http://www.nmai.si.edu/subpage.cfm?subpage=visitor&second=dc – the food is very different representing all of the different Native American cultures; plus the building is beautiful and many days there are very cool performances. The café is very confusing because there is different food at each station (each station represents a geographical region of Indian tribes); do yourself a favor and review the menu before you go. Trust me, the food is worth it, but be brave and try something totally unique. Oh, and the Fry Bread is delicious!
We didn’t go, but if you like gardens, the National Arboretum looked so beautiful. http://www.usna.usda.gov/index.html

If you want to see the National Gallery of Art, but aren’t the type to spend all day looking at art (with our 3 boys it was not a possibility – LOL), they have a highlights self guided tour to do in less than an hour. This brochure points out all of the “must sees” and is a great way to enjoy the masterpieces without being overwhelmed. http://www.nga.gov/ginfo/index.shtm#visitor


I also thought the Korean Memorial was thoughtful and powerful. It is an unique monument with three distinct parts - the solider statues that looks as if they are walking through the jungle; the fountain and then the wall with actual photos of the soldiers who fought. At night the statues come alive and the faces etched on the wall seem to float out of the wall. It is breathtaking.
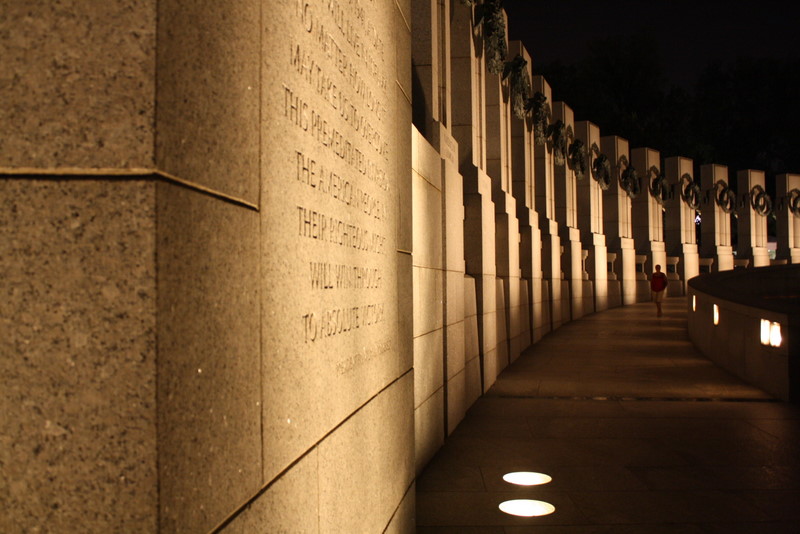 The WWII Memorial honors all Americans (not just the soldiers) for their important role in the war effort. There is a kiosk that you can look up any relatives and find out there part of the story. In fact, you can go online and add the story of any relative who served in the effort. You add the pictures and history and forever on it will be part on the database and accessible at the memorial. What a great tribute to the Greatest Generation.
 Arlington Cemetery is another side trip. You can drive there as parking is available. Once there it is best to take the Tourmobile tour. http://tourmobile.com/tours_arlington.php


As for the Metros – they are the ONLY way to truly get around the town (in my opinion they had a lot of issues compared to other cities public transportation), but overall they were GREAT and so convenient. I would recommend studying some of the maps and get to know your way around and what fares you need to buy. There are passes available which may work best for you. Also, I have to say the people working in the stations were all very friendly and assisted us a lot. Just don’t be afraid to ask. There were some crime issues this summer, but truthfully we rode at night with the kids and did not feel unsafe. I would say the same basic safety awareness that you would use in any big city should be fine. http://www.wmata.com/rail/


